Using Kony MobileFabric, you can build apps for iOS, Android, PhoneGap, JavaScript, and Kony JavaScript.
About this Video:
In this tutorial we show you step by step how to set up a trial Kony MobileFabric account, how to configure Kony mobile services such as identity, integration, messaging, and sync, how to add backend services to your application, and how to invoke backend services by using Kony MobileFabric SDKs.
The following sections explain the steps to setup Kony MobileFabric, configure Salesforce account, configure Kony MobileFabric for your application. From start to finish, we walk you through each step, showing screen shots and giving detailed instructions to get you up and running quickly.
Kony MobileFabric is a Mobile Backend as a Service (MBaaS) provider that helps the developers build native and web apps for mobile. Various backend service are easily integrated with the application irrespective of whether the application is build by using iOS, Android, PhoneGap or JavaScript frameworks.
In this tutorial, you are going to create a CRM Salesforce application for iOS, Android, PhoneGap, and Kony Studio that authenticates the user against a Salesforce backend to retrieve Leads, Contacts and Accounts by using Kony MobileFabric.
To setup Kony MobileFabric , you need a Kony cloud account and atleast one development environment associated with your Kony account. If you do not have Kony Cloud account, please register as new user at http://www.kony.com /products/mbaas/trial and add your first development cloud.
If you already have Kony account, select existing user, provide your credentials and proceed.
You need Client ID and Client Secret from Salesforce to authenticate Kony MobileFabric application against Salesforce.
If you do not have an account already with Salesforce, sign up for free developer account trial.
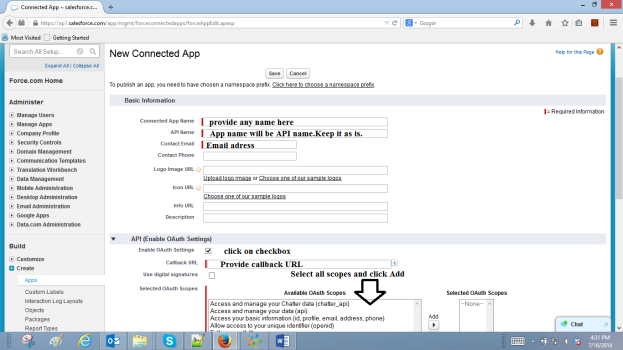
Once you log in to Salesforce, you need to create a connected application . Connected applications use OAuth2.0 protocol and provides tokens to access Salesforce APIs.
Once you create a con nected application , and define the Oauth scopes, Salesforce in return provides with Consumer Key and Consumer Secret for authorizing the connected application. Make a note of Consumer key and consumer secret. You will be using these tokens when configuring Kony MobileFabric. These are referred as ClientID and ClientSecret in Kony MobileFabric Portal.
The following are the necessary inputs required for creating connected application as shown below:
Note: On successful user login, Salesforce calls your callbackURL with an authorization code. For working with Kony MobileFabric, Salesforce callback has no much significance and could be anything.
In the sample CRM app, callback URL is provided as http://localhost:8080
A security token is an automatically generated key that you must add to the end of your password to log in to Salesforce from an untrusted network.
To generate a security token, follow these steps:
Now that you have activated Kony MobileFabric cloud and set up Salesforce account configuration, you need to configure Kony MobileFabric.
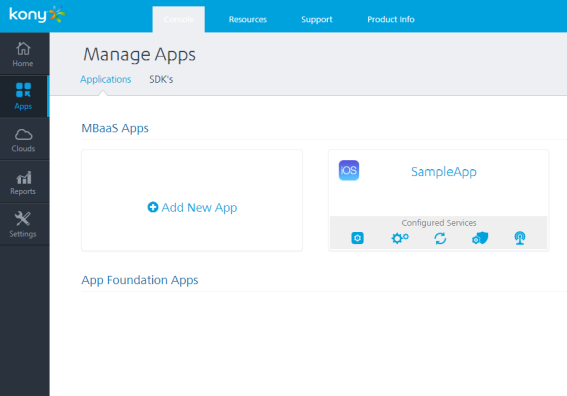
To create MobileFabric app, follow these steps:
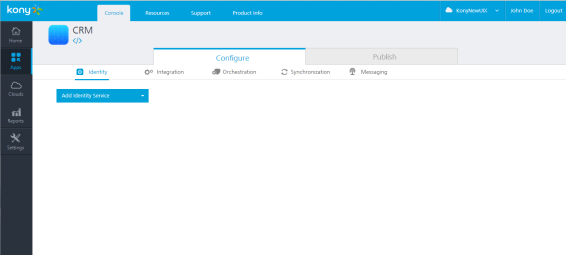
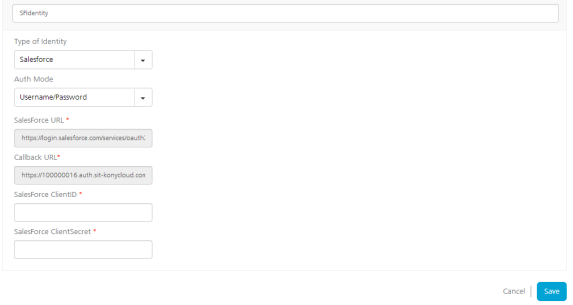
Identity is a service that validates the authentication of your users before they can access your application. Kony MobileFabric allows various types of validations that include:
For your CRM app, you will be using Salesforce Authentication.
To add an identity service, follow these steps:
To learn more on adding identity services, click here .
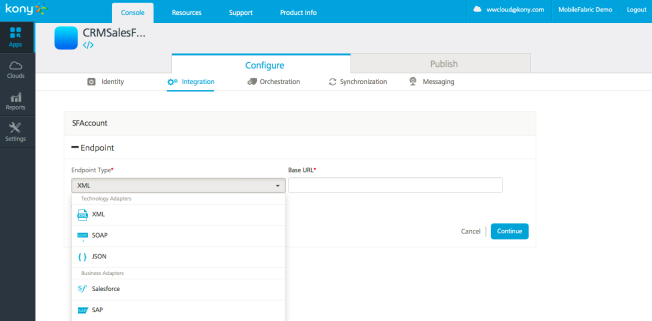
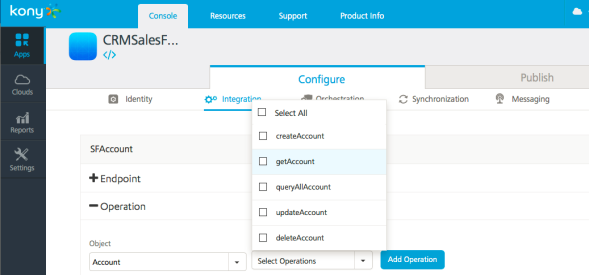
The Integration tab is where you configure services for your application.
To configure integration, follow these steps:

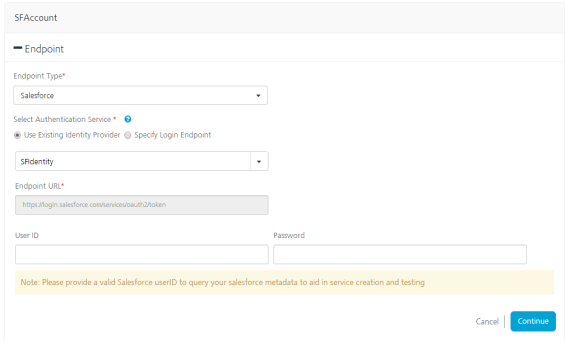 This will link your integration services to your existing identity provider and authenticates Salesforce services implicitly by passing Salesforce SSO token at the backend. Provide valid UserID and Password+Security Token of Salesforce developer account where your connected application is created, and click Continue. Note: The Salesforce Password must be ap pended with the Security Token that you generated from Salesforce account.
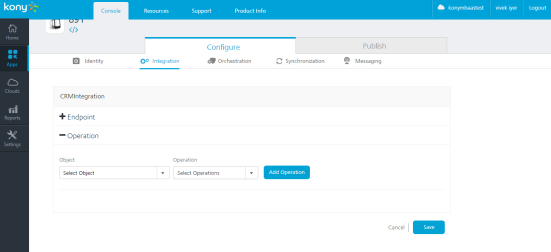 The system fetches all the available objects and operations associated with your Salesforce account.
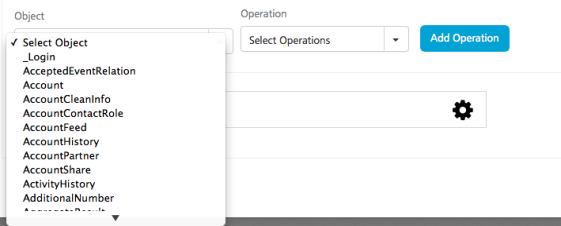
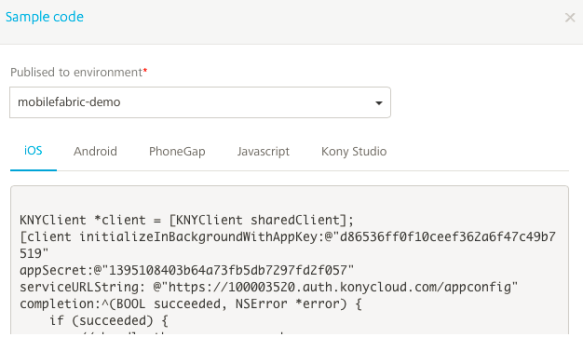
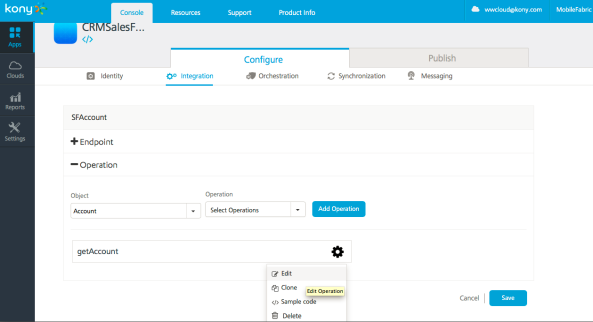 Note: Click Sample Code () option to see the sample code for how to make an integration service in different platforms.
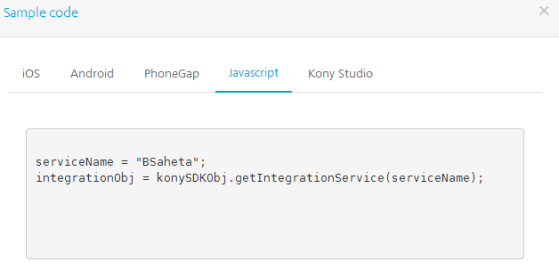
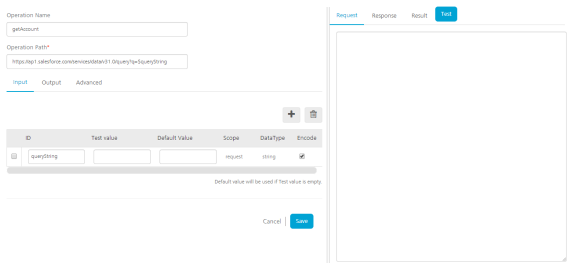
You can see Input parameters querystring required to call the service in Input tab.
You can see in the Output tab that all output parameters from the service and respective Xpath to parse the params from the Service response are pre-configured.
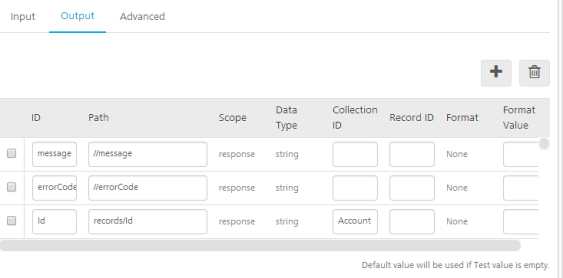
Note: You can add the param by clicking the Add button or delete by selecting the param and clicking the Delete button.
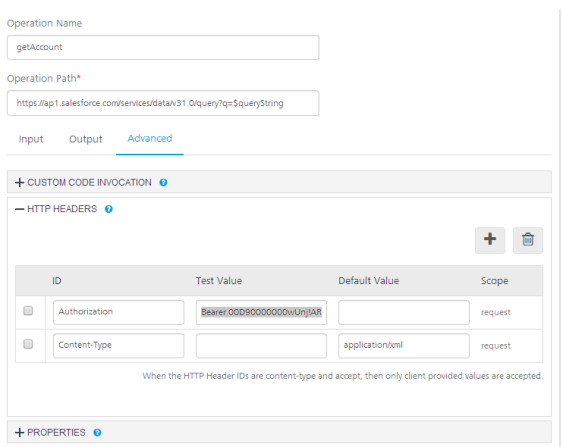
In the Advanced tab “HTTP headers”, you will notice that SFToken is pre-populated for Authorization header to enable service testing from Kony MobileFabric console.
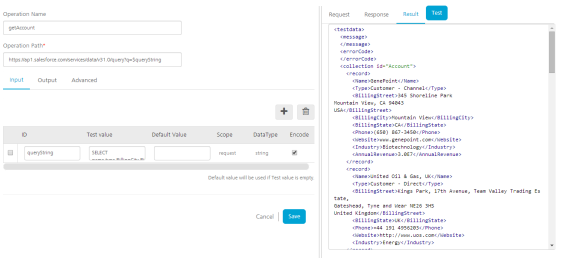
Provide the test value for querystring under the Input params tab and click the Test button to see the response and result. Here are sample queryString params for:
SELECT name,type,BillingCity,BillingState,AnnualRevenue,website,Industry,phone,BillingStreet from Account where type!=null
SELECT ID,NAME,FIRSTNAME,LASTNAME,TITLE,PHONE,EMAIL FROM Contact
SELECT ID,NAME,FIRSTNAME,LASTNAME,TITLE,PHONE,EMAIL FROM Lead
SELECT name,Amount,CloseDate,Type,LeadSource,StageName,ExpectedRevenue,Probability from Opportunity
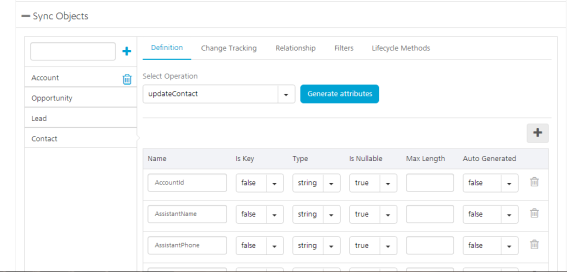
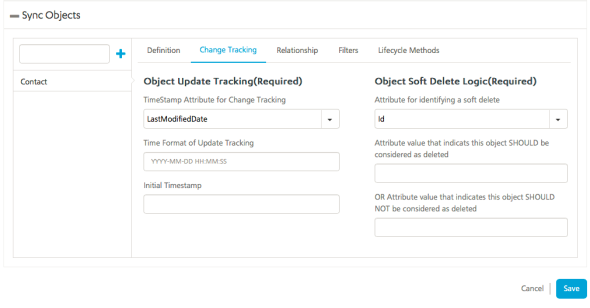
To add Synchronization service to Kony MobileFabric environment, follow these steps:
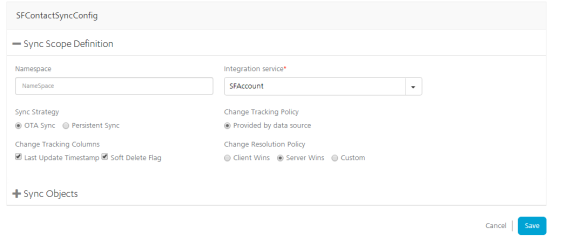
 Note: Sync is supported for Kony Studio and PhoneGap only. You can click Valid Sync Configuration to check whether Sync configuration defined is valid and to download the error log if any. For more information about Synchronization, click here.
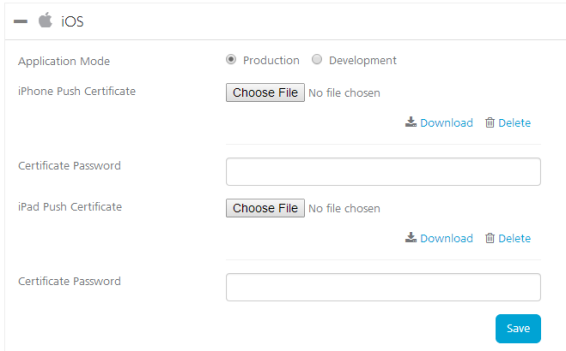
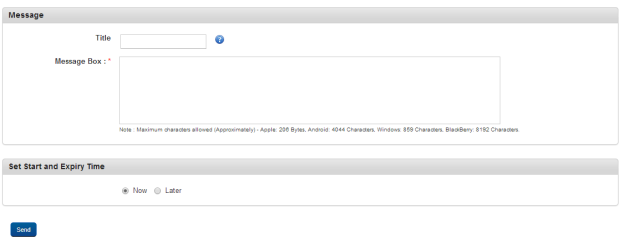
To configure Messaging for your Kony MobileFabric console, you need GCM key for Android and push certificates for iOS to register with Android and Apple push servers.
After Kony MobileFabric configuration, publish services to cloud development server.
To publish services in MobileFabric, follow these steps:
 The publish progress can be seen by expanding the Details tab that appears at the bottom of the page. If publish is successful, you will see Published message under the environment you selected. You can access runtime services console for Integration, Sync, Messaging and Orchestration from here.
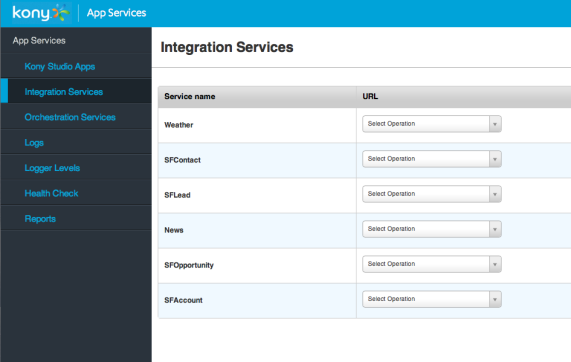 In the App services console, within Integration Services, you can see all your integration services you configured in your Kony MobileFabric console. You can also test your runtime services here.
 curl https://login.salesforce.com/services/oauth2/token -d "grant_type=password" -d "client_id=" -d "client_secret= " -d "username=" -d "password="
https://login.salesforce.com/id/00D90000000wUnjEAE/00590000002rDioAAE","issued_at":"1407249996807","token_type":"Bearer","instance_url":"https://ap1.salesforce.com","signature":"GQ6LUKMW+e1cRBchfFKpzUxzcRZ0+QJ1JVWhjOcvN2s=","access_token":"00D90000000wUnj!AREAQLbHzrILpxIySJkIBHsf6Op.BvrMdtRHTLfasA_Jpd9M1.Pv5woAIlezlHdY_HUT51AjM5udLi9Y1yLUS1UU7PmBBGnq">
To make Kony MobileFabric client initialization call from your app, follow these steps:
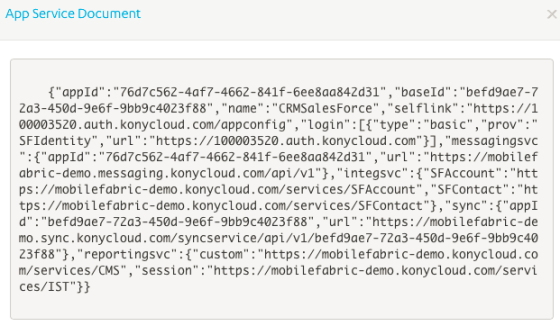 The App service document and Sync Client code for PhoneGap and Kony Studio can be downloaded by clicking on the download icon (
 ) next to the published environment name.
 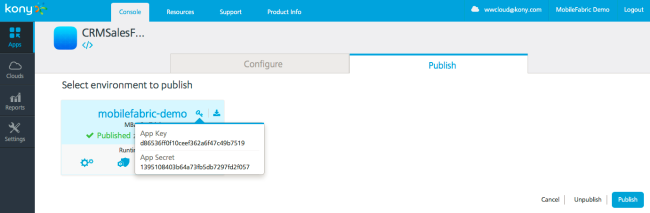 The app key and app secret can also be viewed by clicking on the Key icon (
 ) next to environment cloud name in the Publish screen.
Now that you have set up the Kony MobileFabric and published application to cloud, you will need to download Kony MobileFabric SDKs to start developing the applications.
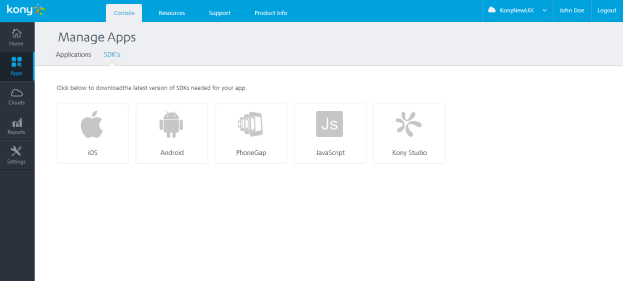
To download required SDKs, navigate to SDKs section in the Manage Apps page, and then click required platform icon to download respective SDKs.
Note: Presently Kony supports Kony MobileFabric SDKs for native iOS, native Android, PhoneGap, JavaScript and Kony Studio.
The first thing is to get a design for the application. You can use Kony Visualizer to design your application. To learn more on Visualizer, follow Visualizer tutorials and Documentation.
After you have got a design, develop it for different platforms by using your choice of a programming language or tool.
In this tutorial, you have learned how to set up Kony MobileFabric, create an application with Salesforce authentication for iOS, Android, PhoneGap and Kony Studio by using Kony MobileFabric.
Github location for the apps:
In this tutorial, you are going to use iOS SDK for Kony MobileFabric. iOS SDK can be downloaded from SDK section of Kony MobileFabric cloud.
You need to add the downloaded framework into your application into Frameworks section.
You need to import the framework into the files wherever you are using it.
Before using any of the Framework classes, you need to initialize the SDK with proper application configuration obtained from the MobileFabric portal you have created (like app key, app secret and service URL).
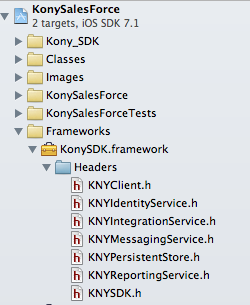
The KNYClient.h class initializes SDK.
NSString *appKey = _sampleConfiguration[@"appkey"]; NSString *appSecret = _sampleConfiguration[@"appsecret"]; NSString *serviceUrl = _sampleConfiguration[@"selflink"]; [KNYClient loggingEnabled:YES]; [[KNYClient sharedClient] initializeInBackgroundWithAppKey:appKey appSecret:appSecret serviceURLString:serviceUrl completion:^(BOOL succeeded,NSError *error) < if (error) < UIAlertView *alert = [[UIAlertView alloc] initWithTitle:error.localizedDescription message:error.localizedRecoverySuggestion delegate:nil cancelButtonTitle:NSLocalizedString(@"OK", nil) otherButtonTitles:nil, nil]; [alert show]; >else < NSLog(@"Successfully Configured"); _isInitialized = YES; >>];
Once the SDK is successfully initialized, you can use the rest of the services.
For authentication, you will be using KNYIdentityService.h class.
NSString *identityName = _sampleConfiguration[@"identityname"]; _authClient = [[KNYIdentityService alloc] initWithIdentityName:identityName];
You can authenticate on different service providers that are configured on the portal based on your requirement. Before authentication, you need to initialize the identity service by using you authentication provider.
if (_authClient) < [_authClient loginInBackgroundWithUsername:username password:password completion:^(BOOL succeeded,NSError *error) < block(succeeded,error); >]; >
Once the identity service is initialized, you will be authenticating using loginInBackgroundWithUsername, Password and completion block providing the proper input values . The system returns a BooleanResultBlock block based on the response. This generates the required backend tokens to store and pass the required tokens in headers when invoking the integration services.
- (void)logoutUsingCompletionBlock:(void (^)(BOOL succeeded,NSError *error))block < [_authClient logoutInBackgroundUsingCompletionBlock:^(BOOL succeeded,NSError *error) < block(succeeded,error); >]; >
For Log out, you need to call logoutInBackground method and it will return a BooleanResultBlock block.
To use integration services you need to initialize KNYIntegrationService.h SDK class with the service name created on the portal side.
_servcClient = [[KNYIntegrationService alloc]initWithServiceName:@""];
_servcClient = [[KNYIntegrationService alloc] initWithServiceName:servicename]; [_servcClient invokeOperationInBackgroundWithOperationName:operationName headers:nil parameters:parameters completion:^(NSDictionary* objects,NSError *error) < block(objects,error); NSLog(@"%@",objects); >];
Once it is successfully initialized, you can call over the required operation name to the integration service providing the necessary input parameters in the form of dictionary.
The system returns the response in the form NSDictionary if the call is successful, else it throws an error.
To use a messaging service and registering for push notifications, you need to use KNYMessagingService.h
_kmsClient = [KNYMessagingService sharedMessagingService];
Initialize the service before using messaging services.
- (void)registerForPushNotifications:(NSData *)deviceToken completion:(void (^)(BOOL succeeded,NSError *error))block < NSString *deviceName = [UIDevice currentDevice].name; NSLog(@"%@",deviceToken); NSError *kmsError; _kmsClient = [KNYMessagingService sharedMessagingService]; if(_kmsClient)< [_kmsClient registerInBackgroundWithDeviceToken:deviceToken alias:deviceName completion:^(BOOL succeeded,NSError *error) < block(succeeded,error); >]; > else < block(false,kmsError); >>
Once the Messaging client is successfully initialized, you need to call registerInBackgroundWithDeviceToken: andAlias: usingBlock: method with the device token obtained from the APNS.
Similarly you will be calling Unregister method to not receive notifications from MobileFabric.
[_kmsClient unregisterInBackgroundUsingCompletionBlock:^(BOOL succeeded,NSError *error) block(succeeded,error) >];
In both the cases a Boolean block is resulted.
For more information, click here.


Android SDK can be downloaded from SDK section of Kony MobileFabric cloud.
Let’s take brief look on how to use Android Kony MobileFabric SDK.
Before you can use any Kony MobileFabric services, you need to authenticate against Kony MobileFabric. The Kony MobileFabric authentication service allows developers to connect to backend authentication sources, such as Active Directory or SalesForce, which are used for subsequent calls to back end services. It is assumed you have already created an authentication service in Kony MobileFabric and need to connect your Android application to the authentication services. Most applications have a login screen that allows the user to enter a username and password, and we will use this assumption going forward to work on authentication that uses a validate() method during the authentication process.
import com.kony.sdk.callback.IntegrationServiceCallback; import com.kony.sdk.callback.LogoutCallback; import com.kony.sdk.client.KonyFactory; import com.kony.sdk.common.IdentityServiceException; import com.kony.sdk.common.IntegrationServiceException; import com.kony.sdk.common.KonyException; import com.kony.sdk.services.identity.IdentityService; import com.kony.sdk.services.integration.IntegrationService; import com.konylabs.android.commons.AppUtils;
Before creating the validate method, you will need to import the Kony MobileFabric libraries. Add the above imports to the top of the LoginActivity class.
KonyClient client = null; IdentityService clientAuthentication = null;
Once the libraries are imported into the LoginActivity, you need to initialize a Kony MobileFabric Client object that is set in the ApplicationContext as well as add the validate method that will call the authentication services.
Additionally, you need to declare the clientAuthentication object as part of the LoginActivity:
KonyClient.initInBackground(getApplicationContext(), AppUtils.APPKEY, AppUtils.APPSECRET, AppUtils.SERVICE_URL, new InitCallback() < @Override public void onSuccess(JSONObject arg0) < // TODO Auto-generated method stub System.out.println("MBAAS succ" ); if(AppUtils.getAuthHeader()==null) progressDialog.cancel(); >@Override public void onFailure(KonyException arg0)The KonyClient object stores the AppKey and AppSecret that you wrote down from the console. In your app, we store these values in a static object in AppUtils class.
The AppSecret and AppKey tell the Kony MobileFabric server that a valid application is communicating with the services. The service URL tells the Kony MobileFabric SDK where the services are located. This allows you to target different environments such as development, testing and production by using the same code while protecting and targeting the proper environment.
public void validate(View view) < String username = ((EditText) findViewById(R.id.userid)).getText() .toString(); String password = ((EditText) findViewById(R.id.password)).getText() .toString(); progressDialog.show(); try < KonyFactory mbaasFactory = new KonyFactory(); // calling Identity service for Validating once authenticated success LoginCallback Success method will execute else Failure. clientAuthentication = mbaasFactory.getIdentityService(AppUtils.PROVIDER); clientAuthentication.loginInBackground(username, password,new LoginCallback()
The validate method retrieves the username and password from the activity_login screen. Once the username and password have been retrieved, you need to create new MbaaS factory object and call the getIdentityService. When initializing the object, you will need to pass in the name of the Identity Provider.
Once the service has been initialized, you can call the loginInBackground method to authenticate the user. The LoginInBackground Methods requires the username, password and a callback method when it is invoked.
@Override public void onSuccess(KonyUser arg0) @Override public void onFailure(IdentityServiceException exception) < // TODO Auto-generated method stub progressDialog.cancel(); JSONObject message = null; try < message = new JSONObject((String) exception.getMessage()); >catch (JSONException e1) < // TODO Auto-generated catch block e1.printStackTrace(); >
The LoginCallback requires two methods to be overridden when it is called, the onSuccess and onFailure methods. When a login fails or there is a connection failure, the onFailure method is invoked. In the onSuccess method, we set the AuthObject and start a new activity.
Once you have authenticated the user, the application can then call Kony MobileFabric backend services. Let’s take a look at how we configured leads backend service.
The example below retrieves the authentication header and adds it as a parameter to the Kony MobileFabric call via a HashMap. If you want to pass additional parameters to the Kony MobileFabric service that you defined when you created the service, simply add them to the HashMap. When we get IntegrationService object from MbaasFactory . getIntegrationService (“SFLead”) , you pass the service name of the Kony MobileFabric Service you created in the console. In the example below, the service is initialized to call the SalesForceLeads service. Once initialized, the invokeOperationInBackground method is called be sending the operation name of the service to be invoked, the parameters we created in the HashMap and a callback.
KonyFactory mbaasFactory = new KonyFactory(); try < mbaasint = mbaasFactory.getIntegrationService("SFAccount"); >catch (KonyException e) < // TODO Auto-generated catch block e.printStackTrace(); >jsonobj = AppUtils.getSFAccountsList(); parameters.put("queryString", "SELECT name,type,BillingCity,BillingState,AnnualRevenue,website,Industry,phone,BillingStreet from Account where type!=null");
On success, the service returns a parsable JSON object. The example above returns the Leads fetched from the call to the getLeads operation of the SFLeads service defined in the Kony MobileFabric integration console.
For more information, click here.
public void register() < context = getApplicationContext(); if (checkPlayServices()) < gcm = GoogleCloudMessaging.getInstance(this); regid = getRegistrationId(context); registerInBackground(); >else < Log.i("gcm registration","No valid Google Play Services APK found."); >>
register() method at LoginActivity.java will register the app with GCM. Registration process will be handled in background method registerInBackground()
private void registerInBackground() < Log.i("First Screen", "registerInBackground"); new AsyncTask() < @Override protected Void doInBackground(Void. arg0) < Log.i("regId-----. ", "entered registerInBackground"); try < if (gcm == null) < gcm = GoogleCloudMessaging.getInstance(context); >regid = gcm.register(AppUtils.getSenderID()); > catch (IOException ex) < Log.i("Exception on recieving regid--. ", ex.toString()); >return null; > >.execute(null, null, null);
After the registration is success, GCM server will send the Registration Key will be handled by MBaasGCMReceiver.java .
public class MBaasGCMReceiver extends WakefulBroadcastReceiver < MbaasFactory mbaasFactory ; static String receivedData; String regId; NotificationManager nm; Notification notification; SharedPreferences prefs; @Override public void onReceive(final Context context, Intent intent) < String action = intent.getAction(); if(action.equalsIgnoreCase("com.google.android.c2dm.intent.REGISTRATION")) < try< regId = intent.getExtras().getString("registration_id"); prefs = context.getSharedPreferences("MbaasRegistrationId", Context.MODE_PRIVATE); // Log.i("first screen", "Saving regId " + regId); SharedPreferences.Editor editor = prefs.edit(); editor.putString("registration_id", regId); editor.commit(); mbaasFactory = new MbaasFactory(); MessagingService msgservice = mbaasFactory.getMessagingService(); msgservice.registerInBackground(regId,AppUtils.getUserAccount(),AppUtils.getDeviceID(context),new MbaasMessagingCallback() < @Override public void onSuccess(boolean arg0) < if(arg0 == true) < Log.d("MBaasGCMReceiver->MbaasMessagingCallback -> success : ",""+arg0); > > @Override public void onFailure(MessagingServiceException arg0) < // TODO Auto-generated method stub Log.d("MBaasGCMReceiver->MbaasMessagingCallback -> failure : ",""+arg0); > >); >catch(Exception e) < Log.d("MBaasGCMReceiver->catch -> e : ",""+e); > > else if(action.equalsIgnoreCase("com.google.android.c2dm.intent.RECEIVE")) < Notification(context,intent.getExtras().get("content").toString()); >>
Notification is used to handle incoming messages from server. Permissions and receiver declaration at Manifest file.
In application tag:

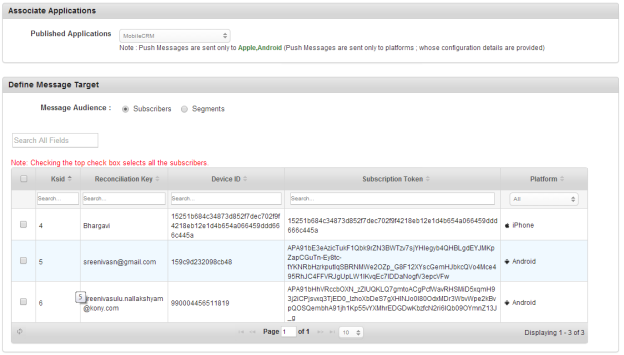
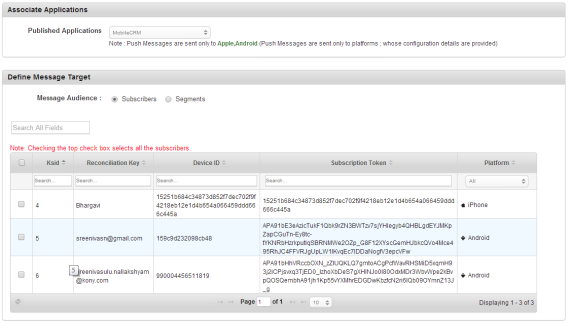
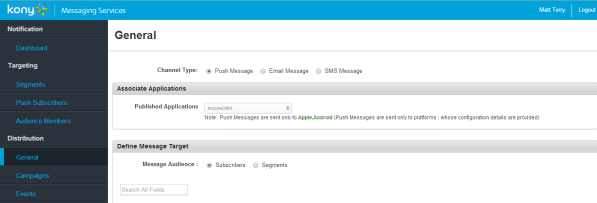
This will list all the subscribers subscribed to Kony Messaging Service from your application to receive push notifications. Select the subscribers you want to send the message.

 Note: To log in to app with your Salesforce credentials, you need to append the security token to the password.
PhoneGap is a web-based mobile development framework based on the Apache Cordova open-source project.
Download PhoneGap SDK from the SDK section of the Kony MobileFabric Cloud.
Initialize the PhoneGap (Cordova) SDK by using the following code. The initialization method fetches the configuration from Kony MobileFabric.
//Sample code to initialize Kony MobileFabric Client

konyMBaaS = new kony.cloud(); konyMBaaS.init("","","",successCallback, errorCallback);
Include the kony-sdk.js file in to html files. You will find this file in the “js-sdk” folder of the downloaded SDK folder.
Once the SDK is successfully initialized, you can use the rest of the services. For authentication you will be using Auth service object.
// Sample code to authenticate to Kony MobileFabric Client

var loginObj = ;authServiceObj = konyMBaaS.auth(“ProviderName”);authServiceObj.login(loginObj,LoginSuccessCallback,LoginFailureCallback);
// Sample code to get backend token for provider

konyMBaaS.auth("CRM").getToken('false',function(data)<>,function(data)<>);
// Sample code to logout from auth service authServiceObj.logout(logoutSuccessCallback,logoutFailureCallback);
The following methods inv oke integration services that are configured in the Kony MobileFabric portal.
// Sample code to fetch the integration service details
var accountsIntegrationObj = konyMBaaS.integration("ServiceName");var post_data =  token >; //passing Authorization header in data. Get token value from getToken accountsIntegrationObj.request("OperationName", post_data, accountsIntegrationSuccessCallback, accountsIntegrationFailureCallback);
// Sample code to subscribe to messaging service

konyMBaaS.messaging().subscribe(osType,deviceId,pnsToken, email, SuccessCallback,FailureCallback);
// Sample code to unsubscribe from messaging service

konyMBaaS.messaging().unsubscribe(SuccessCallback,FailureCallback);
Download Kony MobileFabric Android, i OS, PhoneGap apps from github.

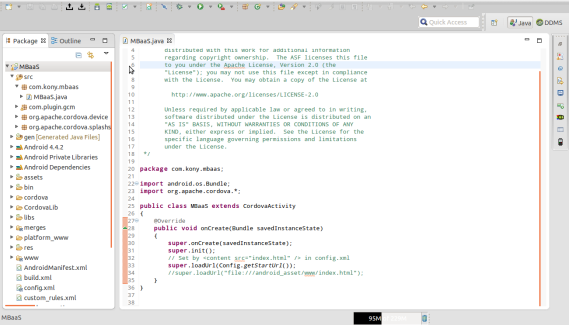 Note: You may need to install ADT plugin to eclipse to run Android project. To validate or see messaging functionality, you need to install and run the app on physical device.


Here we will see how we have built our sample CRM Salesforce application by using Kony Studio and Kony MobileFabric services.
As we already have Visualizer design, we can start our Kony project with importing the Visualizer Project to Kony Studio and integrating the JS logic.
Now let us get into the details on integrating Kony MobileFabric services with Kony Studio.
We need JS/Kony Studio SDK downloaded from SDKs section of Kony MobileFabric console.
Extract the SDK file to find kony-sdk.js file. This needs to be copied to the modules folder of your application.
Now, we can use the APIs provided in JS SDK to communicate to Kony MobileFabric services. To get familiar with Kony Studio MobileFabric SDK APIs, click here.
Before integrating the services, the first step is to initialize the Kony MobileFabric client in the application to authenticate your application against Kony MobileFabric.
client = new kony.sdk(); //Creating MBaaS client instance
The first step is to create a Kony MobileFabric client instance.
//MobileFabric client initialization using init method. client.init(MBaaSConfig.AppKey,// App key of application to use MBaaS APIs MBaaSConfig.AppSecret,// App secret of application to use MBaaS APIs MBaaSConfig.ServiceURL,// URL for App's Service Document initSuccessCallBack,//Initialization success callback initFailureCallBack);//Initialization failure callback
Initialize the Kony MobileFabric client by passing the appkey, appsecret and serviceURL that you got from Kony MobileFabric configuration. In our sample app we have configured these details in a global MBaaSConfig array in config.js module.
The AppSecret and AppKey tell the Kony MobileFabric server that a valid application is communicating with the services. The service URL tells the Kony MobileFabric SDK where the services are located.
Now we need to create an instance for getidentity to invoke login method and generate claims token and accesstoken which will be used in background when invoking Salesforce integration services.
//Let's make use of KonyMobileFabric client instance to invoke getIdentityService method identityInstance = client.getIdentityService(MBaaSConfig.IdentityService); // Invoking login mehod using identityInstance will do login with the given credentials asynchronously and executes the given callback. identityInstance.login(,//salesforce credentials identitySuccess,//login success callback identityError );//login error callback
getIdentityService is the API used to invoke identity service. The identity service authenticates the user against Salesforce and generates claims token and accesstoken required to invoke Salesforce services at the background.
You need to provide a valid Salesforce userID and password+security token to invoke login method and generate tokens.
These methods are available in the sample app in Login.js and InitializeMbaas.js .
To invoke the Salesforce Services and get data for Accounts, Leads, Opportunities and Contacts, we need to invoke our integrating services.
//Making KonyMobileFabric client instance to invoke getIntegrationService method. accountsClient = client.getIntegrationService("SFAccount");//Accounts is service name and accountsClient is Accounts integration service instance //accountsClient.invokeOperation(Accounts service name,headers,query params, SuccessCallback,FailureCallback); accountsClient.invokeOperation("getAccount",<>,MBaaSConfig.getAccountQuery, accountSuccessCallback, integFailureCallback);
We create a getIntegration service object instance. We invoke the SalesForce services we defined in the Kony MobileFabric console by using the invokeOperation on getIntegrationService object.
In the example above, we are creating an instance of “SFAccount” integration service we configured on Kony MobileFabric console and calling “getAccount” operation by using the invokeOperation method.
The result from the invoke operation is captured in the invoke operation successcallback function. Here we parse the result and set the required fields to the segment widget.
The integration services are available in IntegrationServices.js module of our sample app.
Now let’s look at how we configured messaging in our app.
When the app is launched, an alert is thrown for user consent to accept push notifications.
if(response==true) < if(kony.os.deviceInfo().name == "iPhone" ||kony.os.deviceInfo().name == "iPhone Simulator") < callbackiPhoneSetCallbacks(); callbackiPhoneRegister(); >else if(kony.os.deviceInfo().name=="android") < callbackAndroidSetCallbacks(); callbackAndroidRegister(); >>On success alert handle, the register function is invoked to set callbacks and register device with push servers for Android or iOS based on the device OS type.
function callbackiPhoneSetCallbacks() < var callbacksTable = ; kony.push.setCallbacks(callbacksTable); >function callbackAndroidSetCallbacks() < kony.print("\n\n callbackAndroidSetCallbacks in\n\n"); kony.push.setCallbacks(< onsuccessfulregistration: regSuccessAndroidCallback, onfailureregistration: regFailureAndroidCallback, onlinenotification: onlinePushNotificationAndroidCallback, offlinenotification: offlinePushNotificationAndroidCallback, onsuccessfulderegistration: unregSuccessAndroidCallback, onfailurederegistration: unregFailureAndroidCallback >); kony.print("\n\n callbackAndroidSetCallbacks out\n\n"); >
In callbacks , we set the handlers for device registration/deregistration success or failure with push servers; handlers for online/offline notification.
function callbackAndroidRegister() < var configToRegister = ">; kony.push.register(configToRegister); > function callbackiPhoneRegister() < var notificationTypes = [0, 1, 2]; kony.push.register(notificationTypes); >In Kony Studio, to register device with GCM or Apple configuration, use Kony's Push APIs.
For Android, pass GCM client ID that you got from Google console to Kony’s Push register API.
For iPhone, pass notification types array.
If the device is successfully registered to the GCM or Apple cloud, onsuccessfulregistration callback is triggered.
function regSuccessiPhoneCallback(regId)In Successcallabck, we create a messaging instance (msgInstance) by invoking Kony’s MobileFabric getMessagingService method.
Then we invoke register method on msgInstance to subscribe the device with Kony Messaging Service (KMS).
We pass the following parameters to the register method:
Note: Messaging works only on device.
These methods are available in the Messaging.js module of our Sample app.
For configuring Sync, we need to download the Sync files for Kony Studio from Kony MobileFabric console.
Extract the zip file and copy the KonySyncDDL.js, KonySyncLib.js, KonySyncScopes.js, and ContactModel.js to your modules folder in the Kony Studio project.
In our app we are using Sync to get and update the contact data from Salesforce.
function identitySuccess(res) < syncObj=client.getSyncService(); kony.print("sync object created sucessfully"); function syncInitSuccess(params)< kony.print("sync initialized sucessfully"); >function syncInitFailure(error) < kony.print("sync init failed with erro:"+JSON.stringify(error)); >try< syncObj.init(syncInitSuccess,syncInitFailure); >catch(exp) < kony.print("Sync init failed with exp:"+JSON.stringify(exp)); >frmDashBoard.show();//show dashboard form kony.application.dismissLoadingScreen(); >
We are initializing the sync object in the login success callback of Kony MobileFabric login by using the Kony MobileFabric APIs.
Contact.getAll(getAllContactSuccessCallback, eventErrorCallBack);
On click of Contacts in Dashboard, we call getAll on Contact Object from ContactModel.js file. We need to pass success and error callback methods.
function getAllContactSuccessCallback(response) < var lblContactName,lblContactTitle; var contactList =[]; var tempContact =<>; if(response.length<=0) < alert("No records found please sync"); kony.application.dismissLoadingScreen(); frmContacts.show(); return; >else< contactResponse = response; contactDetails=response; for(var i=0;i; tempContact.lblContactName=response[i]._FirstName+" "+response[i]._LastName; if(response[i]._Title==null||response[i]._Title==""||response[i]._Title=="null") tempContact.lblContactTitle="No Title"; else tempContact.lblContactTitle=response[i]._Title; contactList.push(tempContact); > frmContacts.segContacts.removeAll(); frmContacts.segContacts.setData(contactList); frmContacts.show(); kony.application.dismissLoadingScreen(); > >
function eventErrorCallBack(error)
If success, it checks if there is related data in mobile DB and if there is no data then it gives an alert message to use sync.
function syncStartSession()To Initialize sync and start syncing from server, we have provided a Sync button in contacts page. On clicking the Sync button, we call syncStartSession() method that starts the sync process and downloads data from server; stores in to mobile DB and then displays the data on contact form.
Now let’s build and run our Kony MobileFabric App for Android and iPhone.


| Copyright © 2014 Kony, Inc. All rights reserved. |